
この記事は、PHPのフレームワーク「Laravel」でCRUD機能があるTodoリストのアプリを作成するための解説記事です。
私(わや@wayasblog)自身、Laravelを最近勉強し始めたので、かなり丁寧に解説した初心者向けの記事となっています。
CRUDとは、以下の通りです。
- Create(生成)
- Read(読み取り)
- Update(更新)
- Delete(削除)
今回は以下のYouTube動画を参考に、自分なりに機能を少し追加してみました。
» Laravel 5.3 To Do List Application Tutorial
コードだけ見たい!という方は、こちら(GitHub)からどうぞ。
最近はLaravelのアウトプットをしているので、勉強中の方は他の記事も読んでみて下さい。
» Laravelで作成したアプリやアウトプットの一覧はこちら
スポンサーリンク
Laravelで作るTodoリストアプリのイメージ
スクリーンショットで紹介していきます。
今回は、Bootstrapで簡単にスタイルを作成しました。
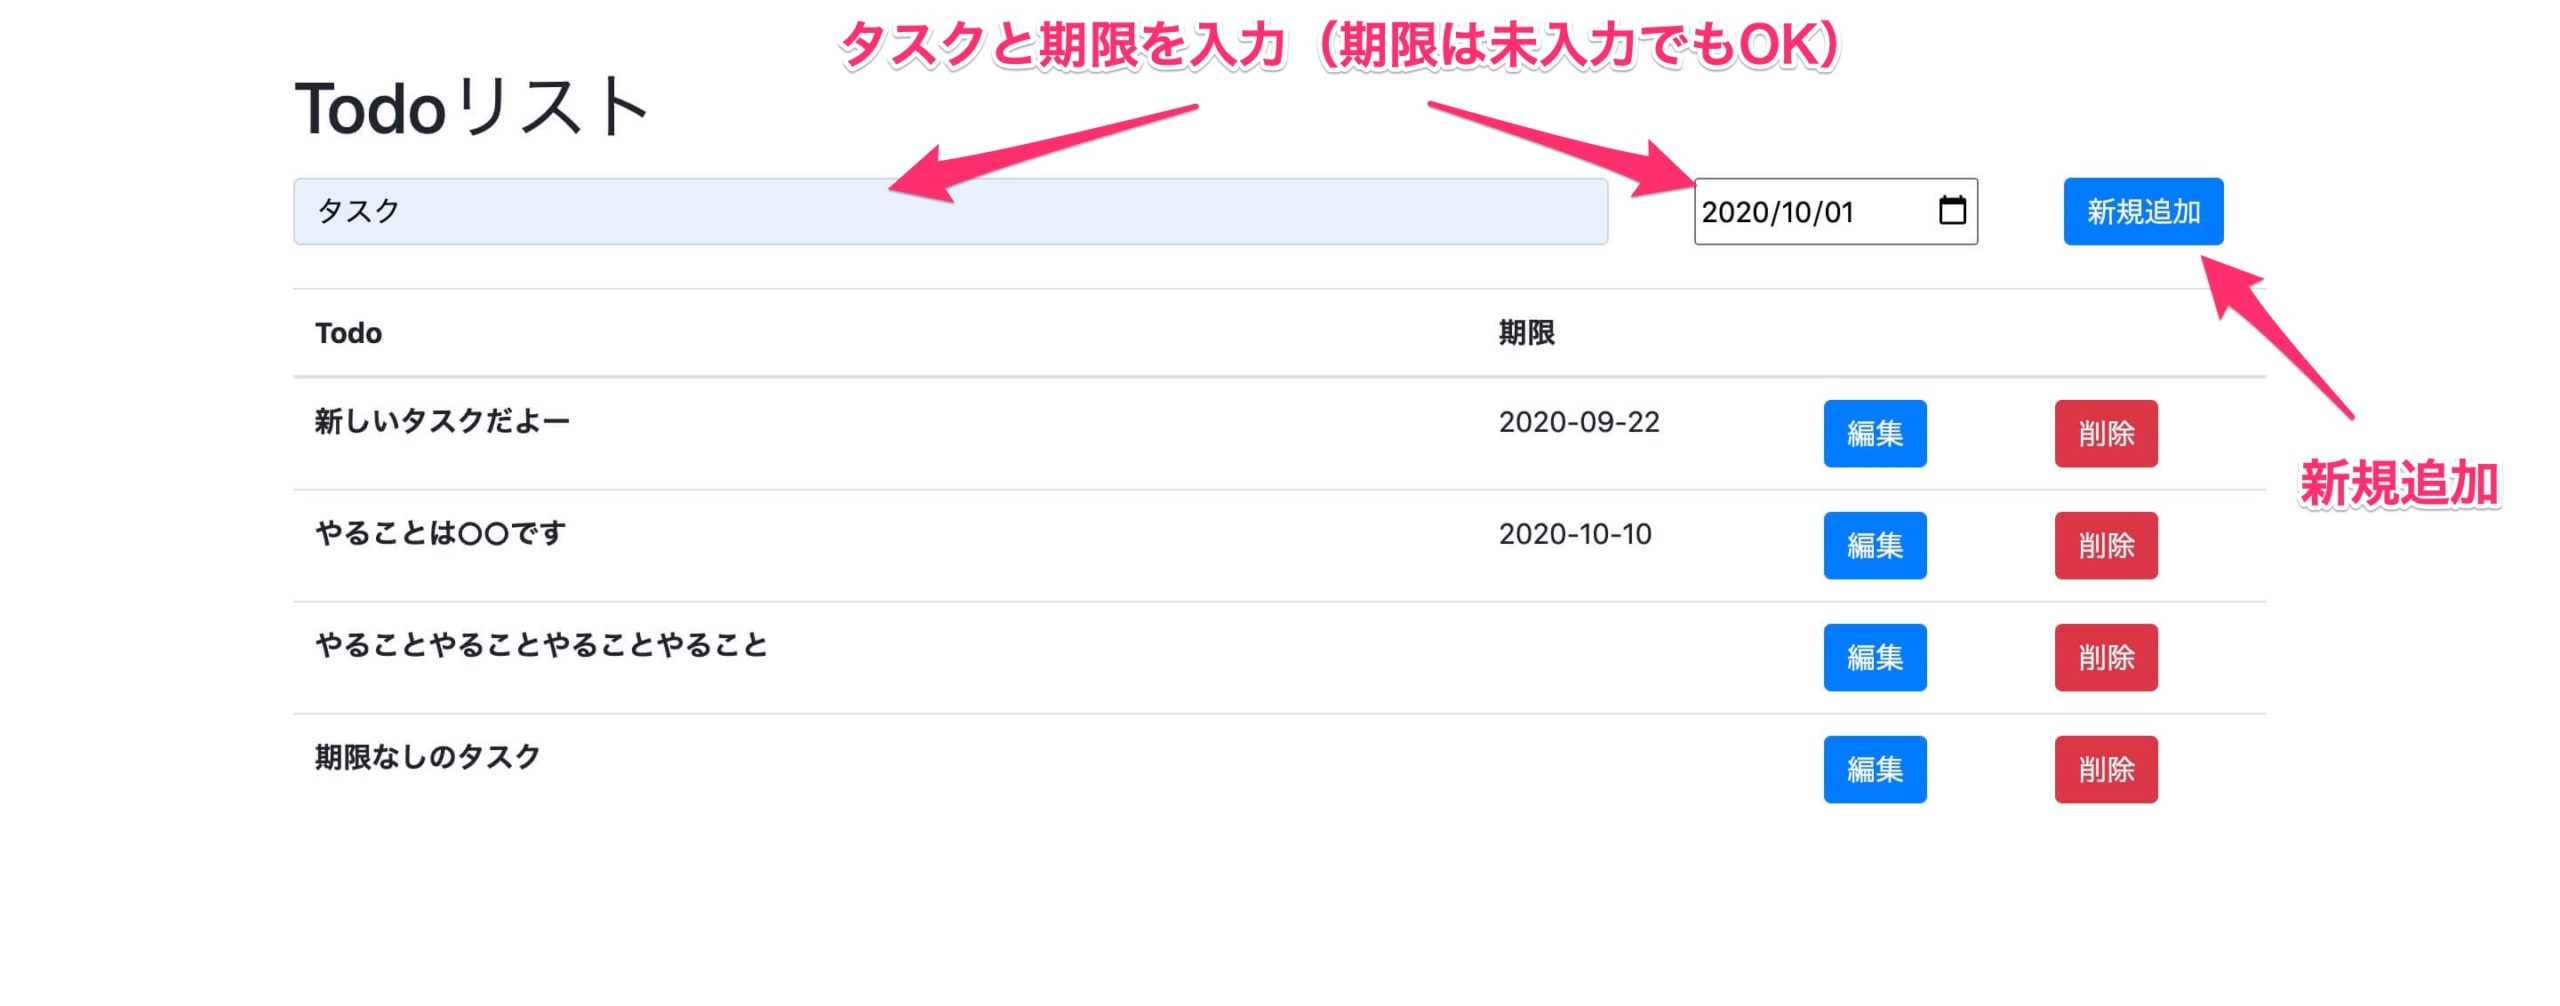
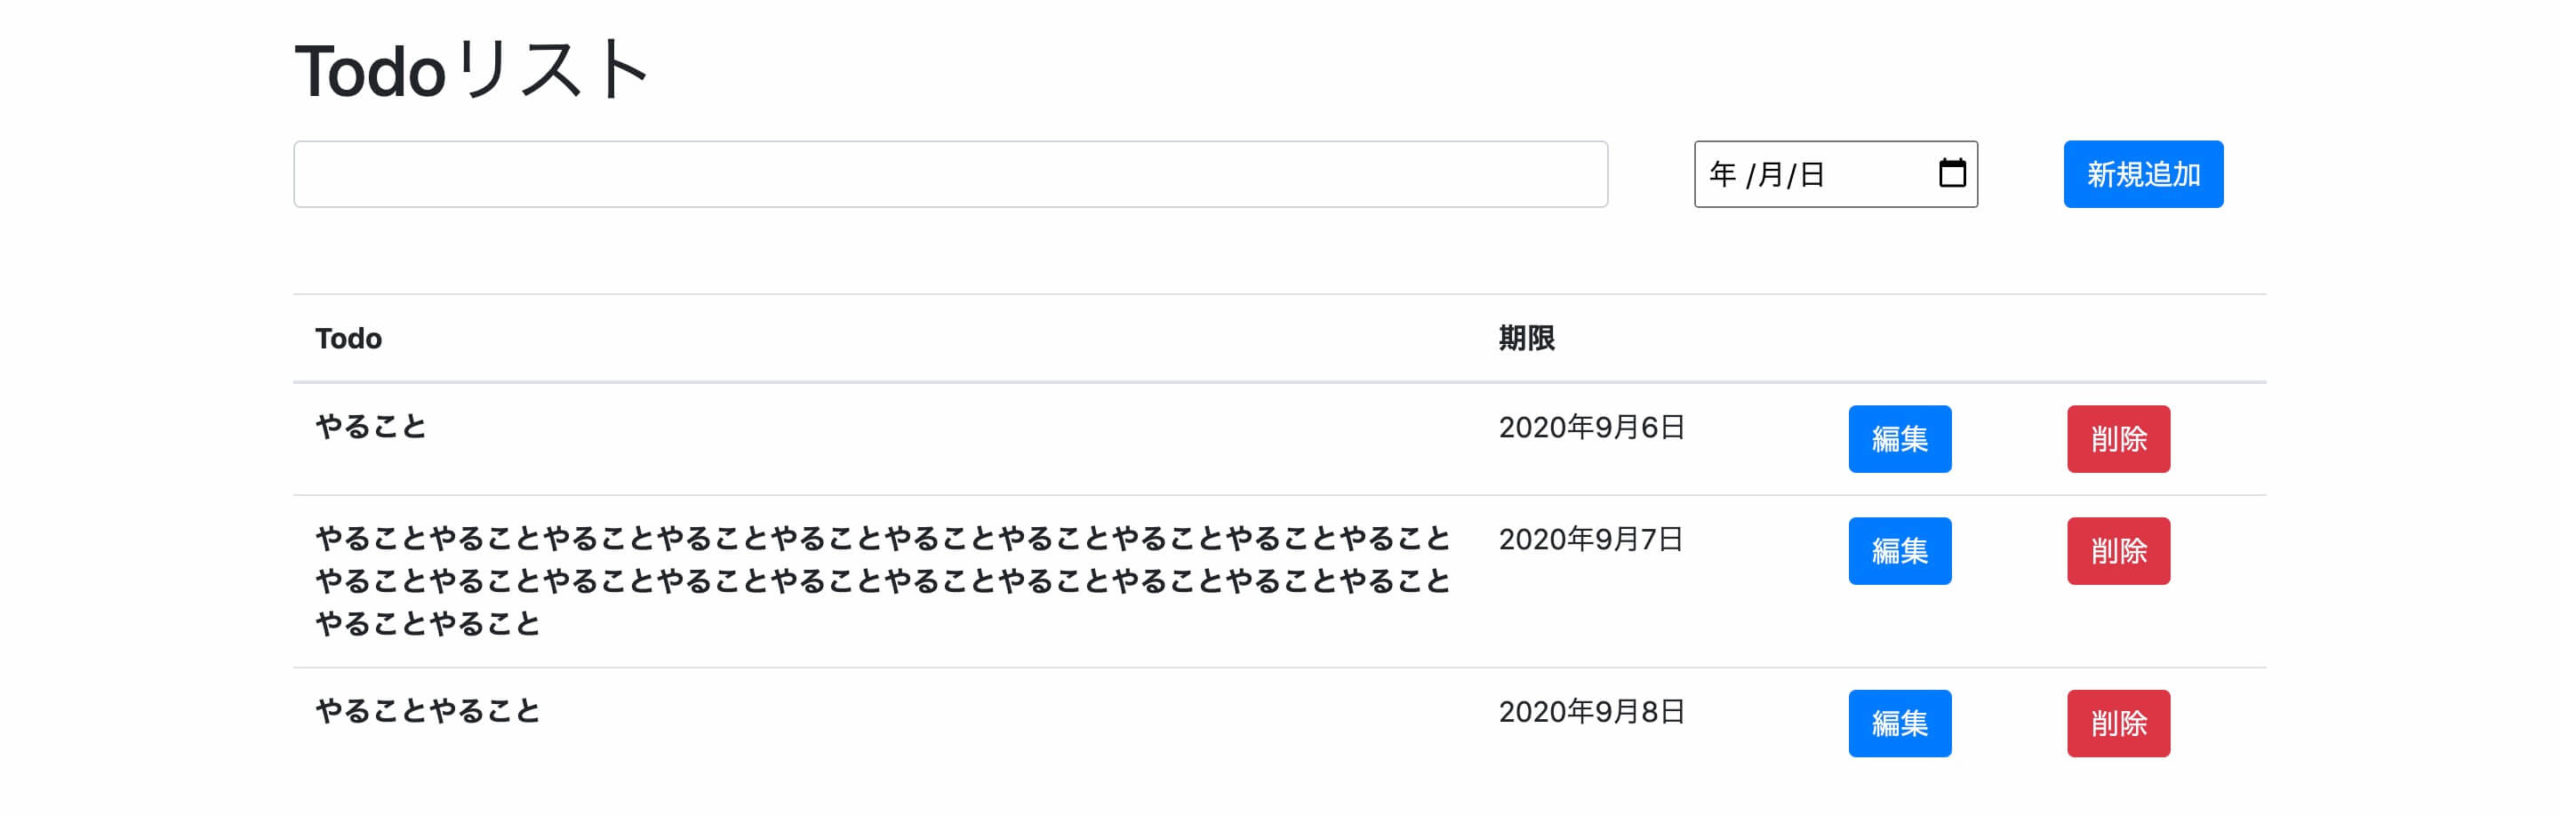
Todoリスト一覧ページ

新しいタスクを追加する時
タスクを編集する時

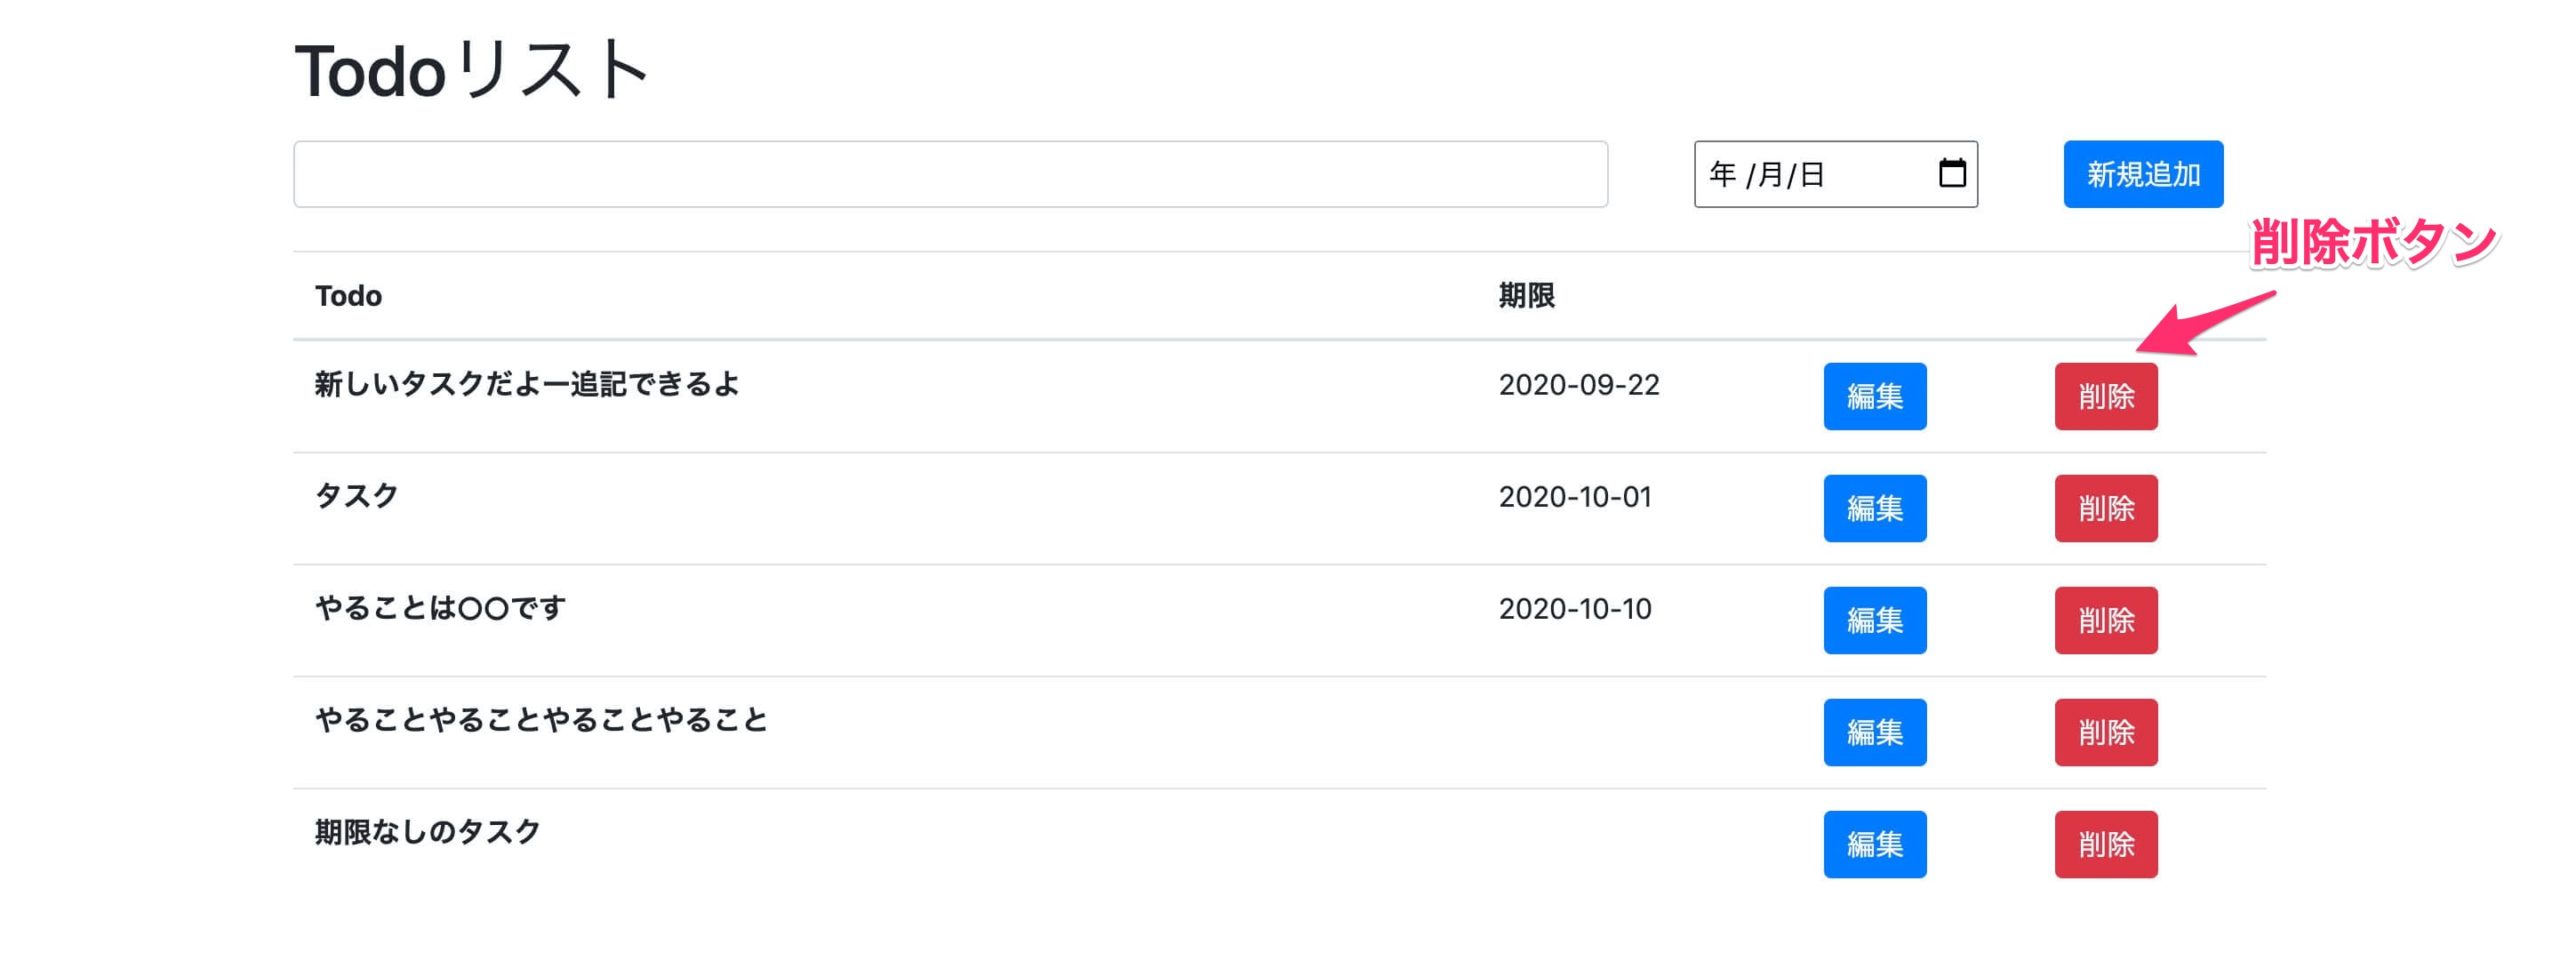
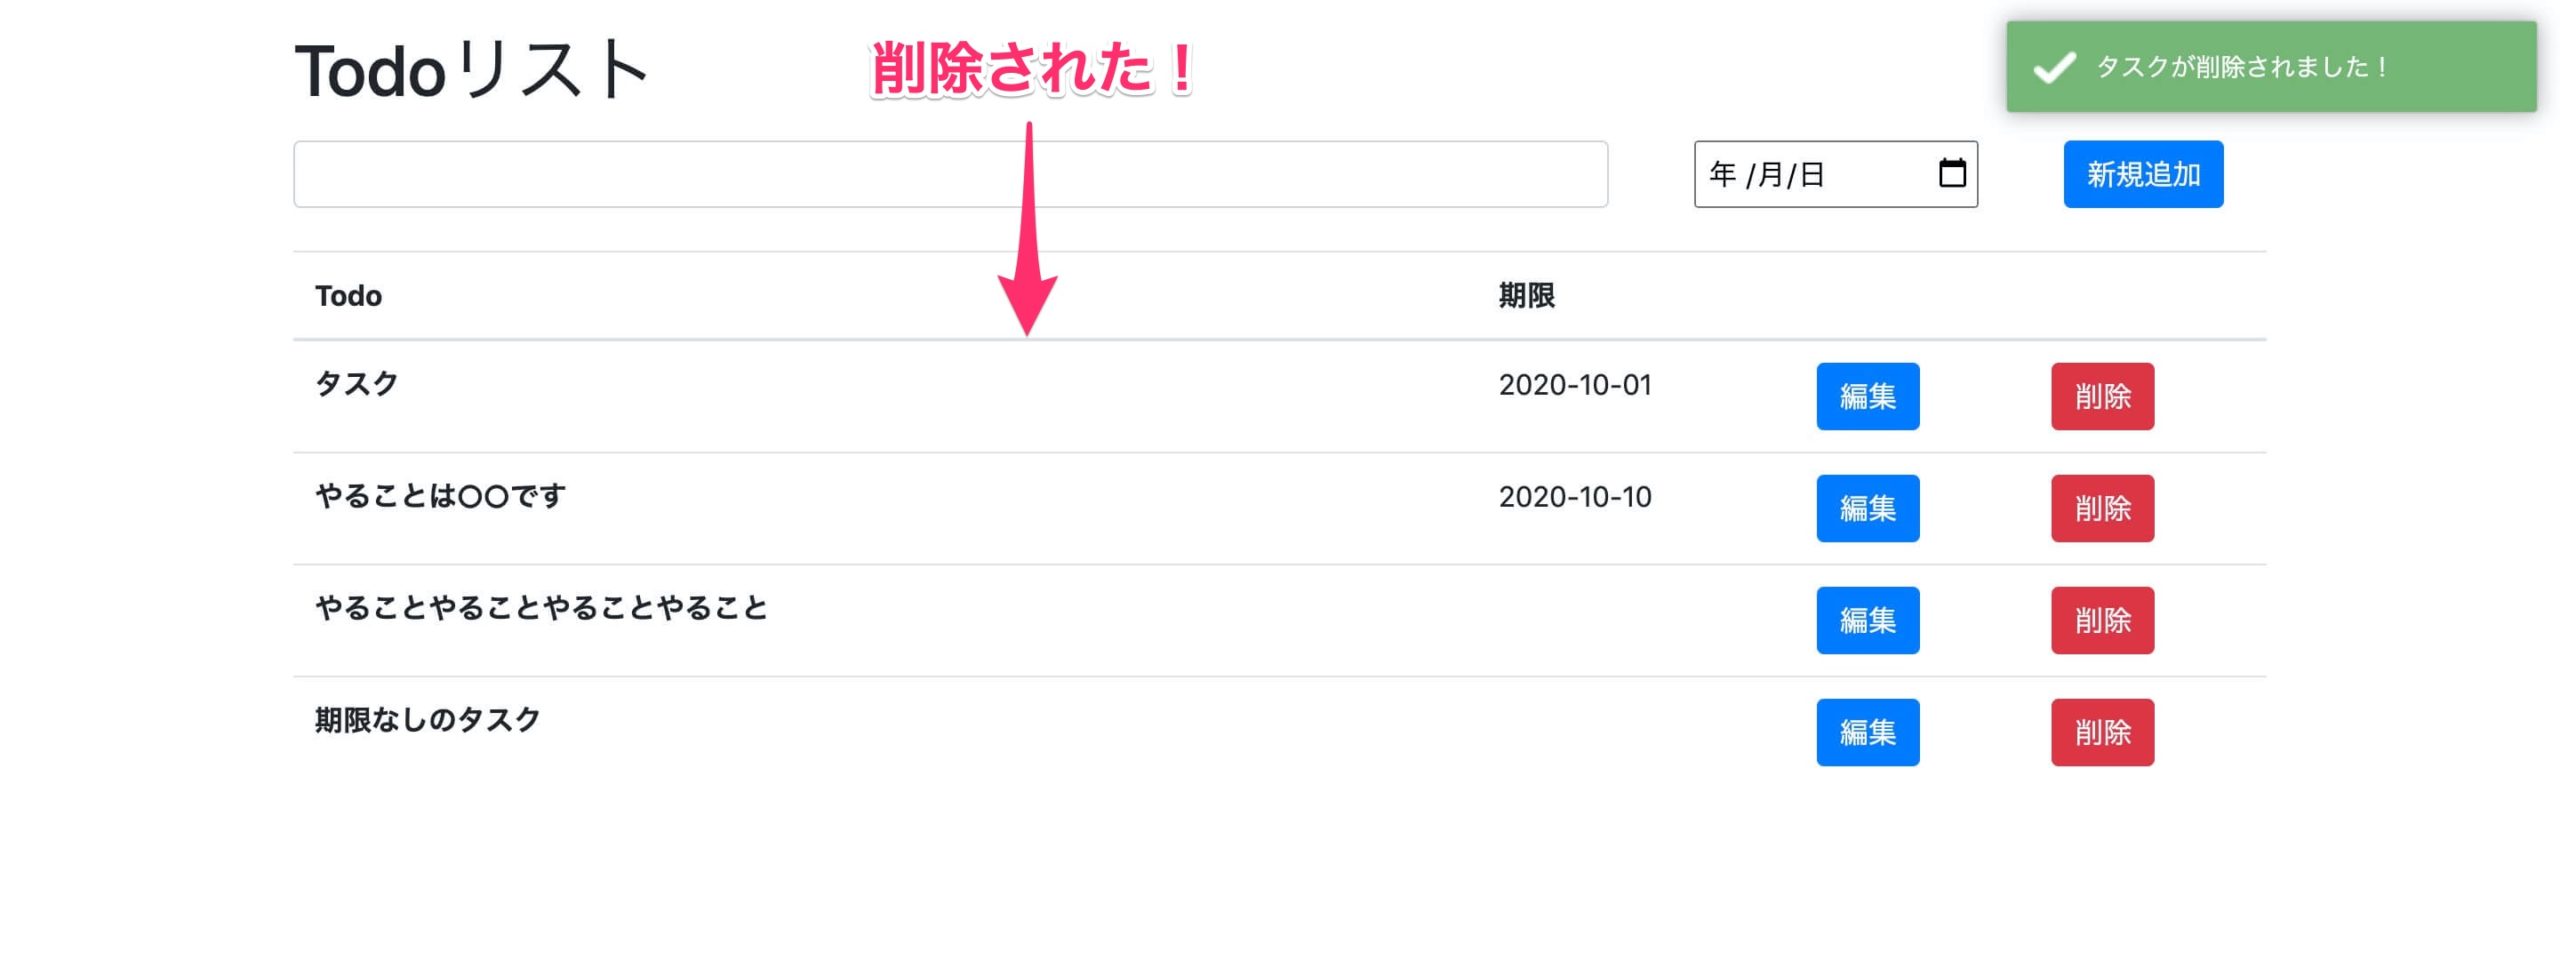
タスクを削除する時
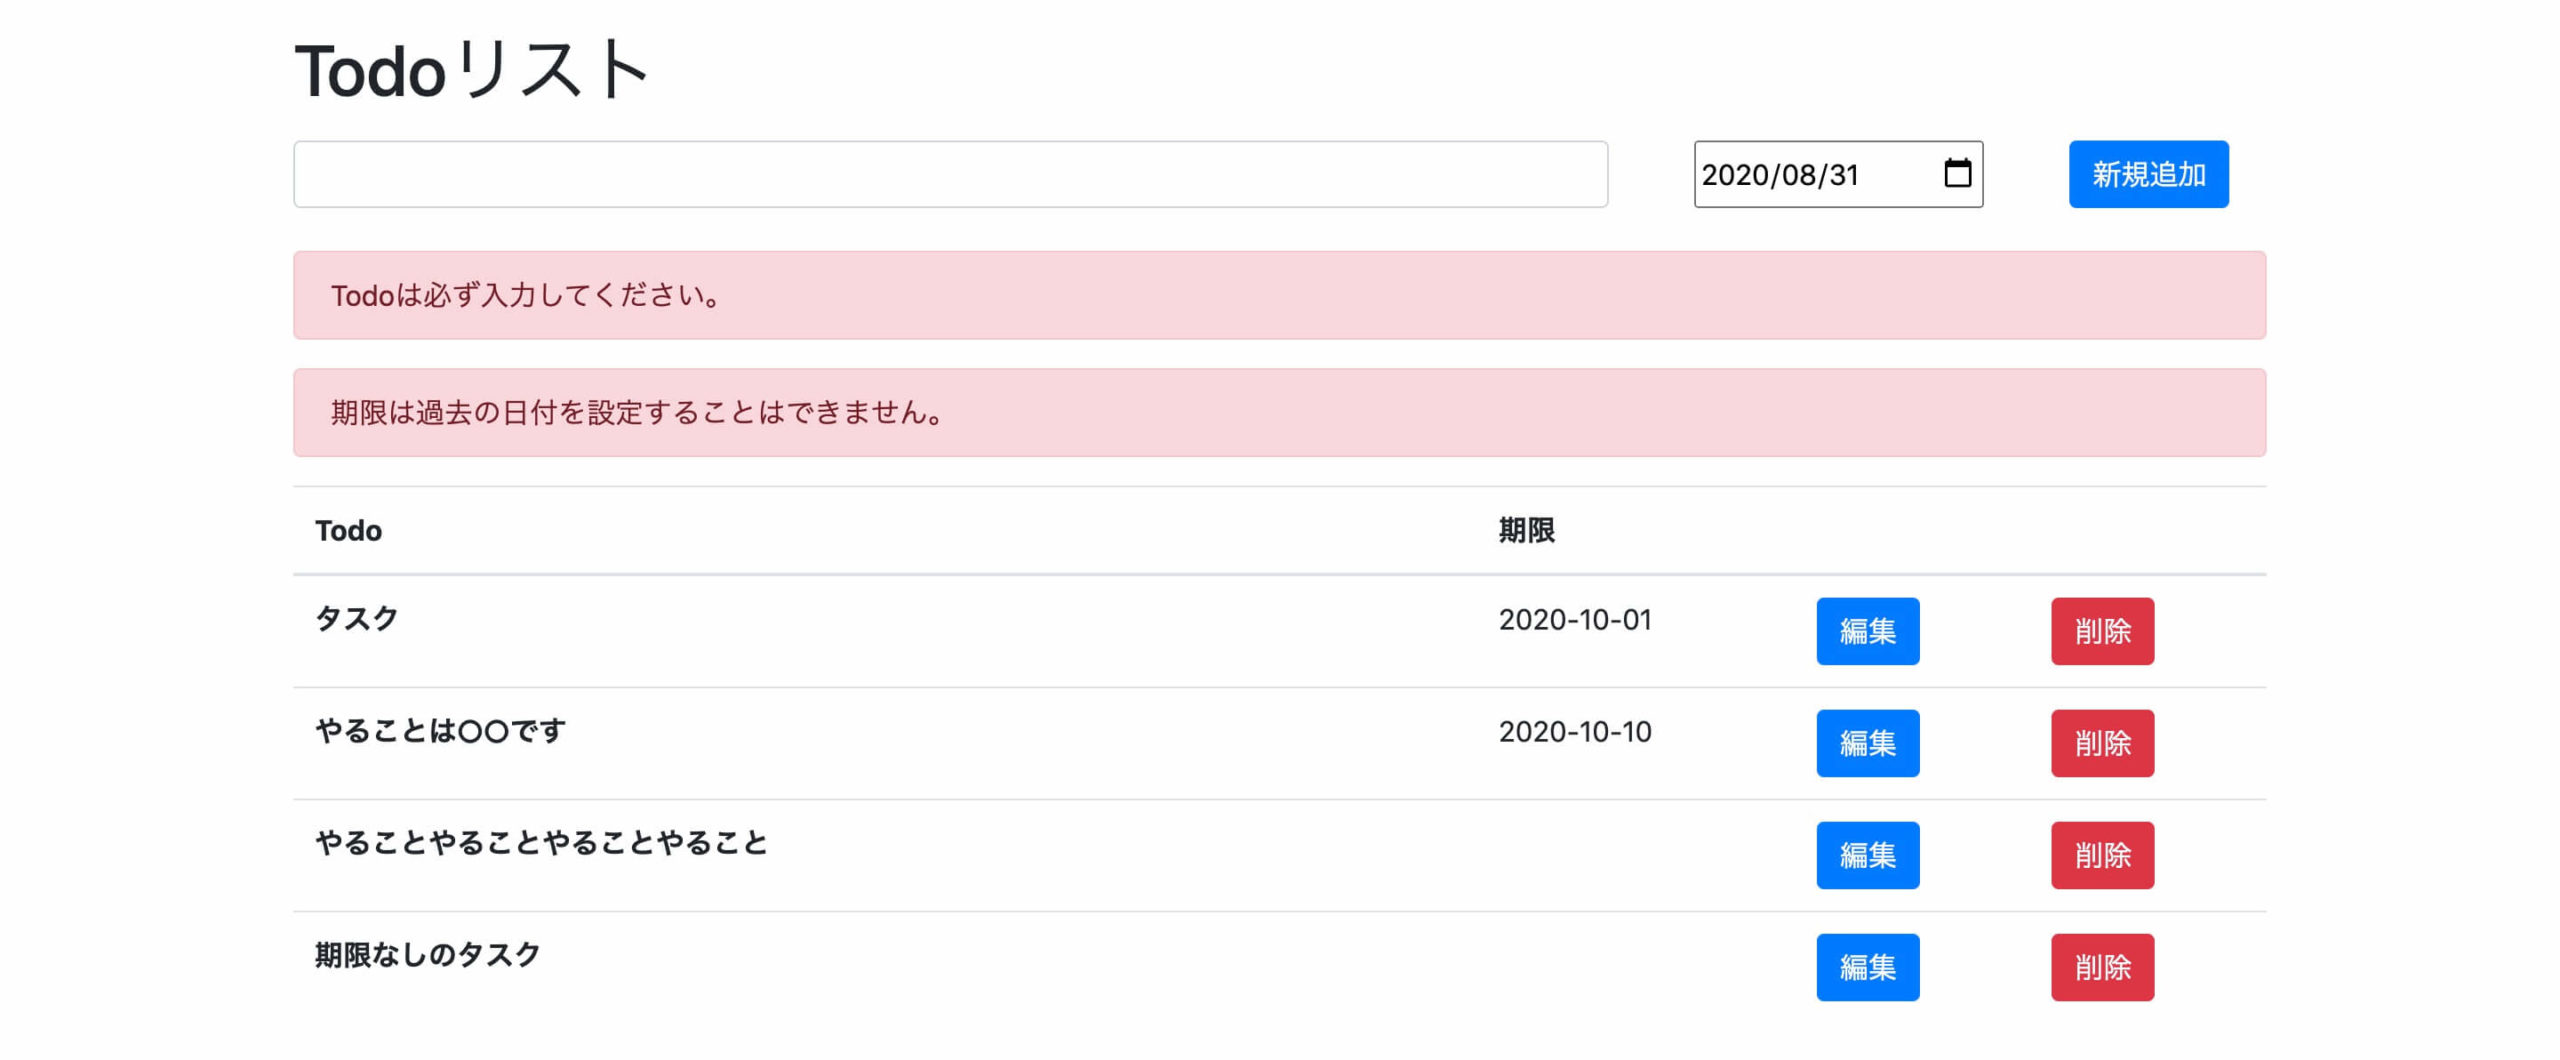
タスク入力時のバリデーション
初期設定
お決まりの初期設定をしていきます。
Laravelのインストール
composer create-project --prefer-dist laravel/laravel laravel_todo
「laravel_todo」というフォルダの中に、Laravelがインストールされました。
phpMyAdimnでDB作成
今回は「laravel_todo」というDBを作成しました。
.envファイルの設定
DB_CONNECTION=mysql
DB_HOST=127.0.0.1
DB_PORT=3306
DB_DATABASE=laravel_todo
DB_USERNAME=root
DB_PASSWORD=root
configファイルの設定
config/app.phpで日本語と時間の設定をします。
'timezone' => 'Asia/Tokyo',
'locale' => 'ja',
以上で、初期設定は終わりです。
コントローラーの作成
コントローラーの役割は、以下の通りです。
- ルートから受け取った情報をモデルに処理をお願いする
- モデルから受け取った情報をビューに表示する
今回は、以下のコマンドを実行します。
php artisan make:controller TodoController --resource
app/Http/Controllers/TodoController.phpが作成されました。
最後の--resourceを付けることで、コントローラーと一緒にCRUD処理のためのメソッドが作成されます。
まずは、Todo一覧ページ(index)のみ。
<?php

namespace App\Http\Controllers;

use Illuminate\Http\Request;

class TodoController extends Controller
{
    /**
     * Display a listing of the resource.
     *
     * @return \Illuminate\Http\Response
     */
    public function index()
    {
        return view('todos.index');
    }

    /**
     * Show the form for creating a new resource.
     *
     * @return \Illuminate\Http\Response
     */
    public function create()
    {
        //
    }

    /**
     * Store a newly created resource in storage.
     *
     * @param  \Illuminate\Http\Request  $request
     * @return \Illuminate\Http\Response
     */
    public function store(Request $request)
    {
        //
    }

    /**
     * Display the specified resource.
     *
     * @param  int  $id
     * @return \Illuminate\Http\Response
     */
    public function show($id)
    {
        //
    }

    /**
     * Show the form for editing the specified resource.
     *
     * @param  int  $id
     * @return \Illuminate\Http\Response
     */
    public function edit($id)
    {
        //
    }

    /**
     * Update the specified resource in storage.
     *
     * @param  \Illuminate\Http\Request  $request
     * @param  int  $id
     * @return \Illuminate\Http\Response
     */
    public function update(Request $request, $id)
    {
        //
    }

    /**
     * Remove the specified resource from storage.
     *
     * @param  int  $id
     * @return \Illuminate\Http\Response
     */
    public function destroy($id)
    {
        //
    }
}
ルーティングの設定
routes/web.phpを編集します。
<?php

use Illuminate\Support\Facades\Route;

/*
|--------------------------------------------------------------------------
| Web Routes
|--------------------------------------------------------------------------
|
| Here is where you can register web routes for your application. These
| routes are loaded by the RouteServiceProvider within a group which
| contains the "web" middleware group. Now create something great!
|
*/

Route::get('/', function () {
    return view('welcome');
});

Route::resource('/todos', 'TodoController');
上記のように書くことで、CRUDルーティングを1度に行うことができます。
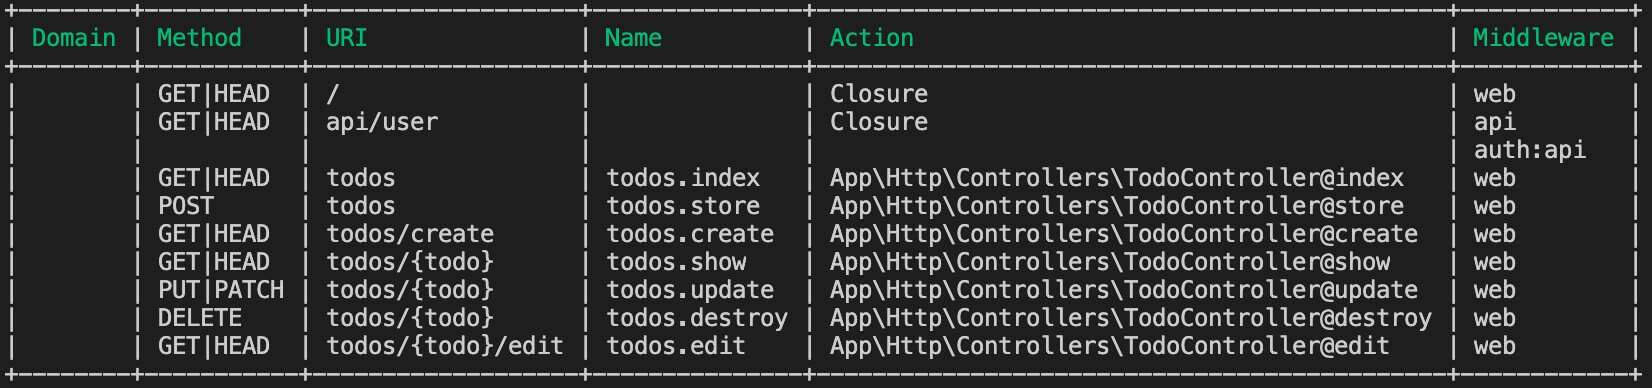
php artisan route:list
上記のコマンドを打つことで、設定されているルートを確認することができます。
今回の場合は、以下のようにでてきました。
ビューの作成
resources/viewsにtodosフォルダを作り、その中にindex.blade.phpを作成します。
手っ取り早くそれなりの見た目にするために、BootstrapのCSSを読み込みます。

フォームは「Laravel Collective」の「Forms & HTML」を使うので、インストールします。
※参考:Laravel Collective
composer require laravelcollective/html
現時点でのtodo.blade.phpはこのようになっています。
Todoリストの内容は、べた書きしています。
コードは、以下の通りです。
<!DOCTYPE html>
<html lang="ja">
<head>
    <meta charset="UTF-8">
    <meta name="viewport" content="width=device-width, initial-scale=1.0">
    <meta http-equiv="X-UA-Compatible" content="ie=edge">
    <title>Todoリスト</title>
    <link rel="stylesheet" href="https://stackpath.bootstrapcdn.com/bootstrap/4.5.2/css/bootstrap.min.css" integrity="sha384-JcKb8q3iqJ61gNV9KGb8thSsNjpSL0n8PARn9HuZOnIxN0hoP+VmmDGMN5t9UJ0Z" crossorigin="anonymous">
</head>
<body>
    <div class="container mt-3">
        <h1>Todoリスト</h1>
    </div>
    <div class="container mt-3">
        <div class="container mb-4">
            {!! Form::open(['route' => 'todos.store', 'method' => 'POST']) !!}
            {{ csrf_field() }}
                <div class="row">
                    {{ Form::text('newTodo', null, ['class' => 'form-control col-8 mr-5']) }}
                    {{ Form::date('newDeadline', null, ['class' => 'mr-5']) }}
                    {{ Form::submit('新規追加', ['class' => 'btn btn-primary']) }}
                </div>
            {!! Form::close() !!}
        </div>

        <table class="table">
            <thead>
                <tr>
                    <th scope="col" style="width: 60%">Todo</th>
                    <th scope="col">期限</th>
                    <th scope="col"></th>
                    <th scope="col"></th>
                </tr>
            </thead>
            <tbody>
                <tr>
                    <th scope="row" class="todo">やること</th>
                    <td>2020年9月6日</td>
                    <td><a href="" class="btn btn-primary">編集</a></td>
                    <td>{{ Form::submit('削除', ['class' => 'btn btn-danger']) }}</td>
                </tr>
                <tr>
                    <th scope="row">やることやることやることやることやることやることやることやることやることやることやることやることやることやることやることやることやることやることやることやることやることやること</th>
                    <td>2020年9月7日</td>
                    <td><a href="" class="btn btn-primary">編集</a></td>
                    <td>{{ Form::submit('削除', ['class' => 'btn btn-danger']) }}</td>
                </tr>
                <tr>
                    <th scope="row">やることやること</th>
                    <td>2020年9月8日</td>
                    <td><a href="" class="btn btn-primary">編集</a></td>
                    <td>{{ Form::submit('削除', ['class' => 'btn btn-danger']) }}</td>
                </tr>
            </tbody>
        </table>
    </div>
</body>
</html>
モデルとマイグレーションの作成
モデルはDBとの連携を行う機能で、マイグレーションはDBを管理する機能です。
php artisan make:model Todo -m
コマンドで-mを付けると、database/migrationsにマイグレーションファイル(database/migrations/XXXX_XX_XX_XXXXXX_create_todos_table.php)も一緒に作られるので、中身を書いていきましょう。
<?php

use Illuminate\Database\Migrations\Migration;
use Illuminate\Database\Schema\Blueprint;
use Illuminate\Support\Facades\Schema;

class CreateTodosTable extends Migration
{
    /**
     * Run the migrations.
     *
     * @return void
     */
    public function up()
    {
        Schema::create('todos', function (Blueprint $table) {
            $table->bigIncrements('id');
            $table->text('todo');
            $table->date('deadline')->nullable();
            $table->timestamps();
        });
    }

    /**
     * Reverse the migrations.
     *
     * @return void
     */
    public function down()
    {
        Schema::dropIfExists('todos');
    }
}
同時にapp/Todo.phpが作成されるので、中身を書いていきます。
<?php

namespace App;

use Illuminate\Database\Eloquent\Model;

class Todo extends Model
{
    protected $fillable = [
        'todo',
        'deadline',
    ];
}
ここまで完了したら、以下のコマンドでDBにテーブルが作成されます。
php artisan migrate
バリデーションの設定
app/Http/Controllers/TodoController.phpのstoreに書いていきます。
新規追加・編集ともに、以下のルールを設けます。
- Todoは必ず入力しなければならない
- Todoは100文字以上入力することはできない
- 期限の入力は必須ではない
- 期限に過去の日付を設定することはできない
public function store(Request $request)
    {
        $request->validate([
            'newTodo'     => 'required|max:100',
            'newDeadline' => 'nullable|after:"now"',
        ]);
    }
todo.blade.phpにエラーを表示させます。
<div class="container mt-3">
        <h1>Todoリスト</h1>
    </div>
    <div class="container mt-3">
        <div class="container mb-4">
            {!! Form::open(['route' => 'todos.store', 'method' => 'POST']) !!}
            {{ csrf_field() }}
                <div class="row">
                    {{ Form::text('newTodo', null, ['class' => 'form-control col-8 mr-5']) }}
                    {{ Form::date('newDeadline', null, ['class' => 'mr-5']) }}
                    {{ Form::submit('新規追加', ['class' => 'btn btn-primary']) }}
                </div>
            {!! Form::close() !!}
        </div>
        {{-- エラー表示 ここから --}}
        @if ($errors->has('newTodo'))
            <p class="alert alert-danger">{{ $errors->first('newTodo') }}</p>
        @endif
        @if ($errors->has('newDeadline'))
            <p class="alert alert-danger">{{ $errors->first('newDeadline') }}</p>
        @endif
        {{-- エラー表示 ここまで --}}

        <table class="table">
このままだと英語で表示されるので、日本語化していきます。
resources/langのenフォルダと同階層にjaフォルダを作成し、validation.phpをコピペ。
修正した箇所は以下の通りです。
'after' => ':attributeは過去の日付を設定することはできません。',
'max' => [
        'string' => ':attributeは:max文字以内で入力してください。',
    ],
'required' => ':attributeは必ず入力してください。',

'attributes' => [
        'todo'     => 'Todo',
        'deadline' => '期限',
    ],
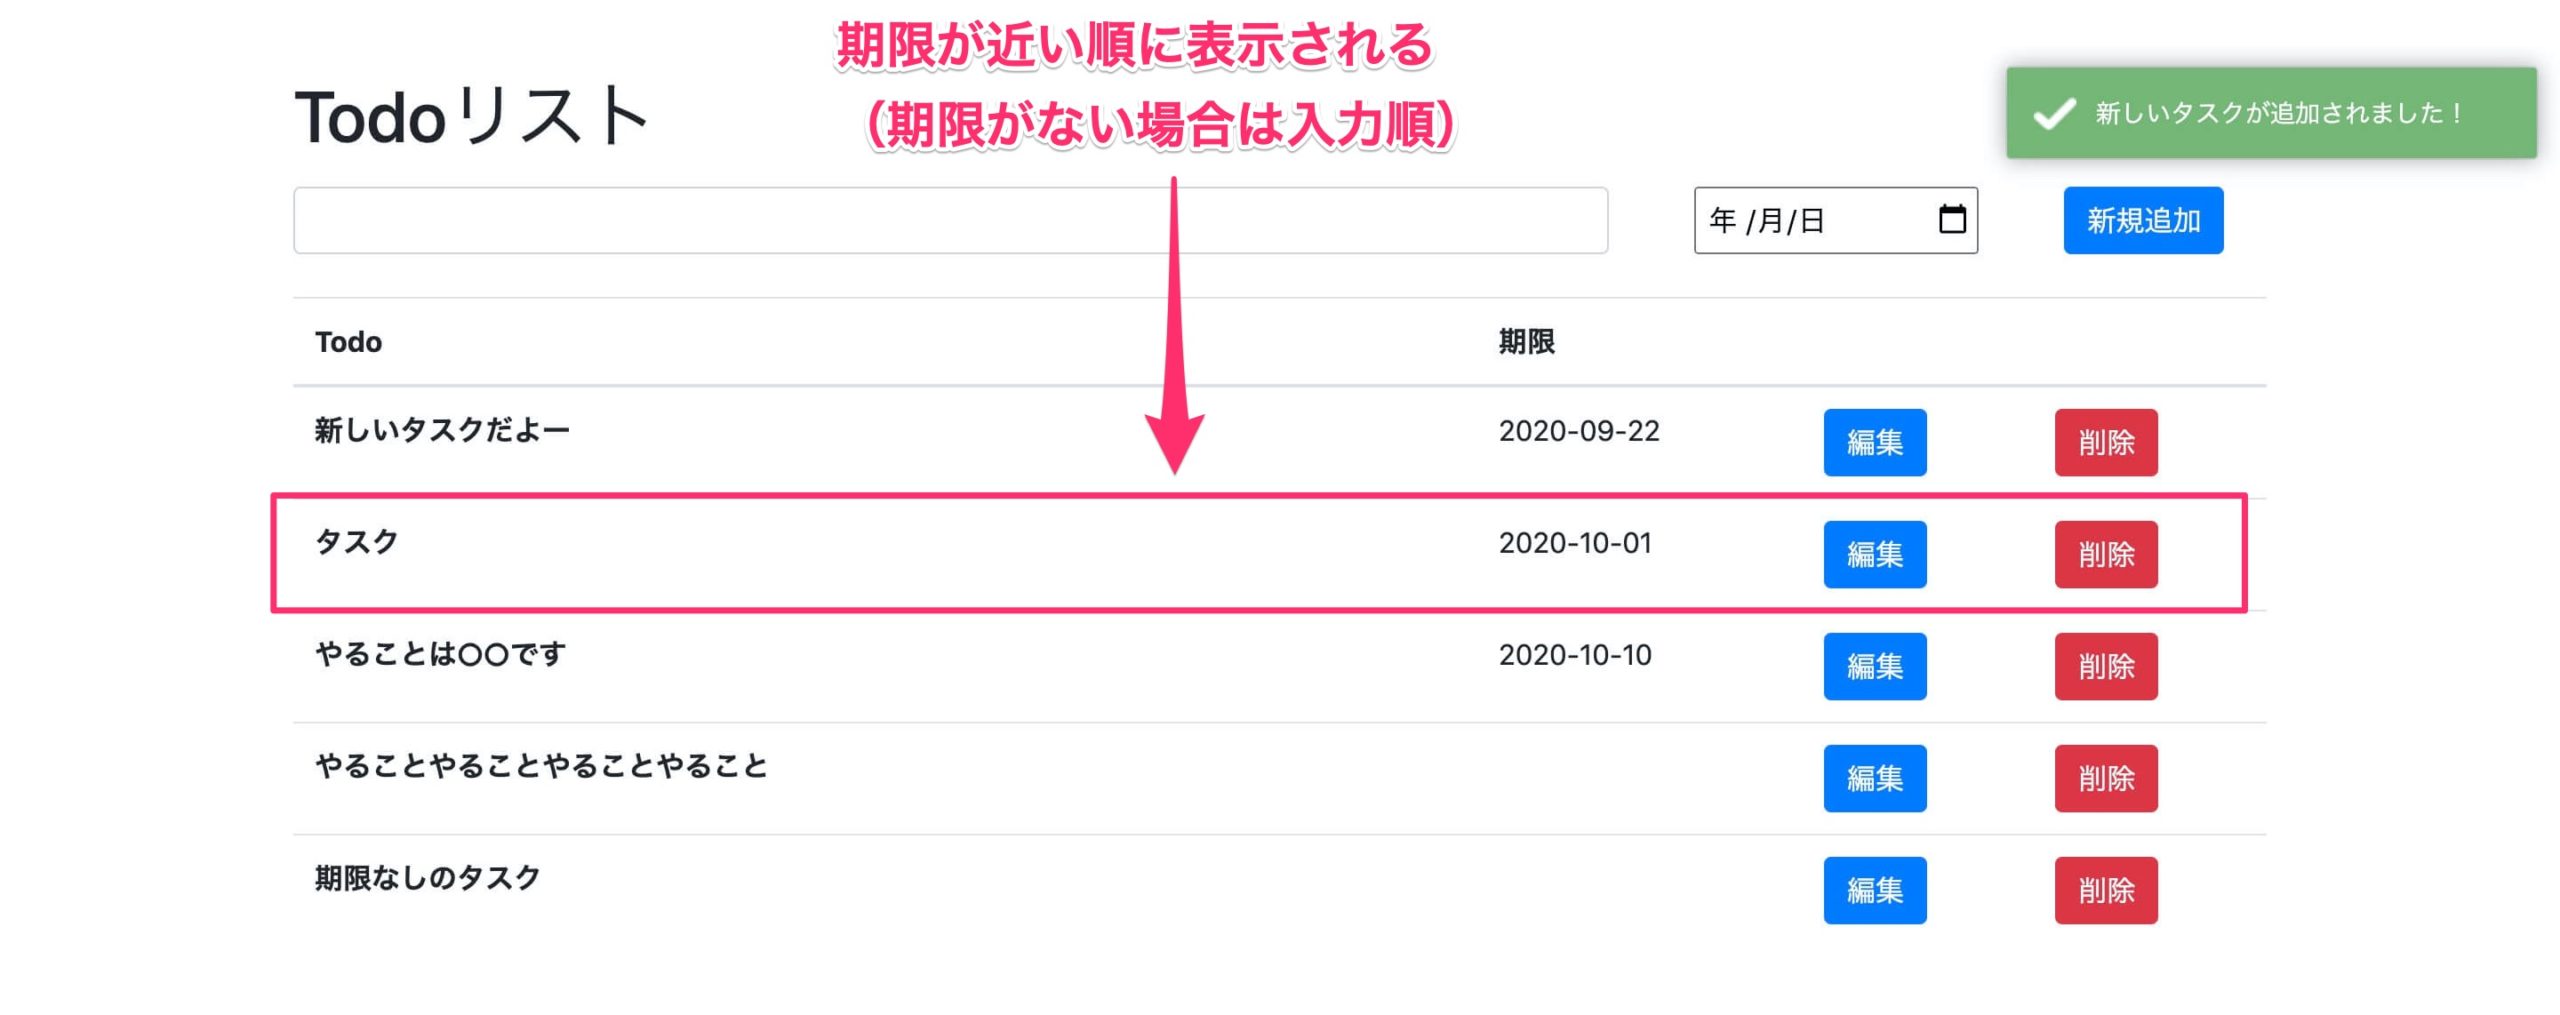
入力したTodoをDBに保存し、一覧に表示する
app/Http/Controllers/TodoController.phpに追記します。
まずはuse宣言を追記。
use App\Todo;
そして、indexとstoreに書いていきます。
public function index()
    {
        // 期限が近いものから順に表示する、期限がないものは最後に持っていく
        $todos = Todo::orderByRaw('`deadline` IS NULL ASC')->orderBy('deadline')->get();

        return view('todos.index', [
            'todos' => $todos,
        ]);
    }
期限が近い順に並べましたが、期限なし(null)が1番上に来てしまうので、上記のような記述にしています。
public function store(Request $request)
    {
        $request->validate([
            'newTodo'     => 'required|max:100',
            'newDeadline' => 'nullable|after:"now"',
        ]);

        // DBに保存
        Todo::create([
            'todo'     => $request->newTodo,
            'deadline' => $request->newDeadline,
        ]);

        return redirect()->route('todos.index');
    }
resources/views/todos/index.blade.phpはこんな感じになりました。
<!DOCTYPE html>
<html lang="ja">
<head>
    <meta charset="UTF-8">
    <meta name="viewport" content="width=device-width, initial-scale=1.0">
    <meta http-equiv="X-UA-Compatible" content="ie=edge">
    <title>Todoリスト</title>
    <link rel="stylesheet" href="https://stackpath.bootstrapcdn.com/bootstrap/4.5.2/css/bootstrap.min.css" integrity="sha384-JcKb8q3iqJ61gNV9KGb8thSsNjpSL0n8PARn9HuZOnIxN0hoP+VmmDGMN5t9UJ0Z" crossorigin="anonymous">
</head>
<body>
    <div class="container mt-3">
        <h1>Todoリスト</h1>
    </div>
    <div class="container mt-3">
        <div class="container mb-4">
            {!! Form::open(['route' => 'todos.store', 'method' => 'POST']) !!}
            {{ csrf_field() }}
                <div class="row">
                    {{ Form::text('newTodo', null, ['class' => 'form-control col-8 mr-5']) }}
                    {{ Form::date('newDeadline', null, ['class' => 'mr-5']) }}
                    {{ Form::submit('新規追加', ['class' => 'btn btn-primary']) }}
                </div>
            {!! Form::close() !!}
        </div>
        {{-- エラー表示 ここから --}}
        @if ($errors->has('newTodo'))
            <p class="alert alert-danger">{{ $errors->first('newTodo') }}</p>
        @endif
        @if ($errors->has('newDeadline'))
            <p class="alert alert-danger">{{ $errors->first('newDeadline') }}</p>
        @endif
        {{-- エラー表示 ここまで --}}

        <table class="table">
            <thead>
                <tr>
                    <th scope="col" style="width: 60%">Todo</th>
                    <th scope="col">期限</th>
                    <th scope="col"></th>
                    <th scope="col"></th>
                </tr>
            </thead>
            <tbody>
                @foreach ($todos as $todo)
                    <tr>
                        <th scope="row" class="todo">{{ $todo->todo }}</th>
                        <td>{{ $todo->deadline }}</td>
                        <td><a href="" class="btn btn-primary">編集</a></td>
                        <td>{{ Form::submit('削除', ['class' => 'btn btn-danger']) }}</td>
                    </tr>
                @endforeach
            </tbody>
        </table>
    </div>
</body>
</html>
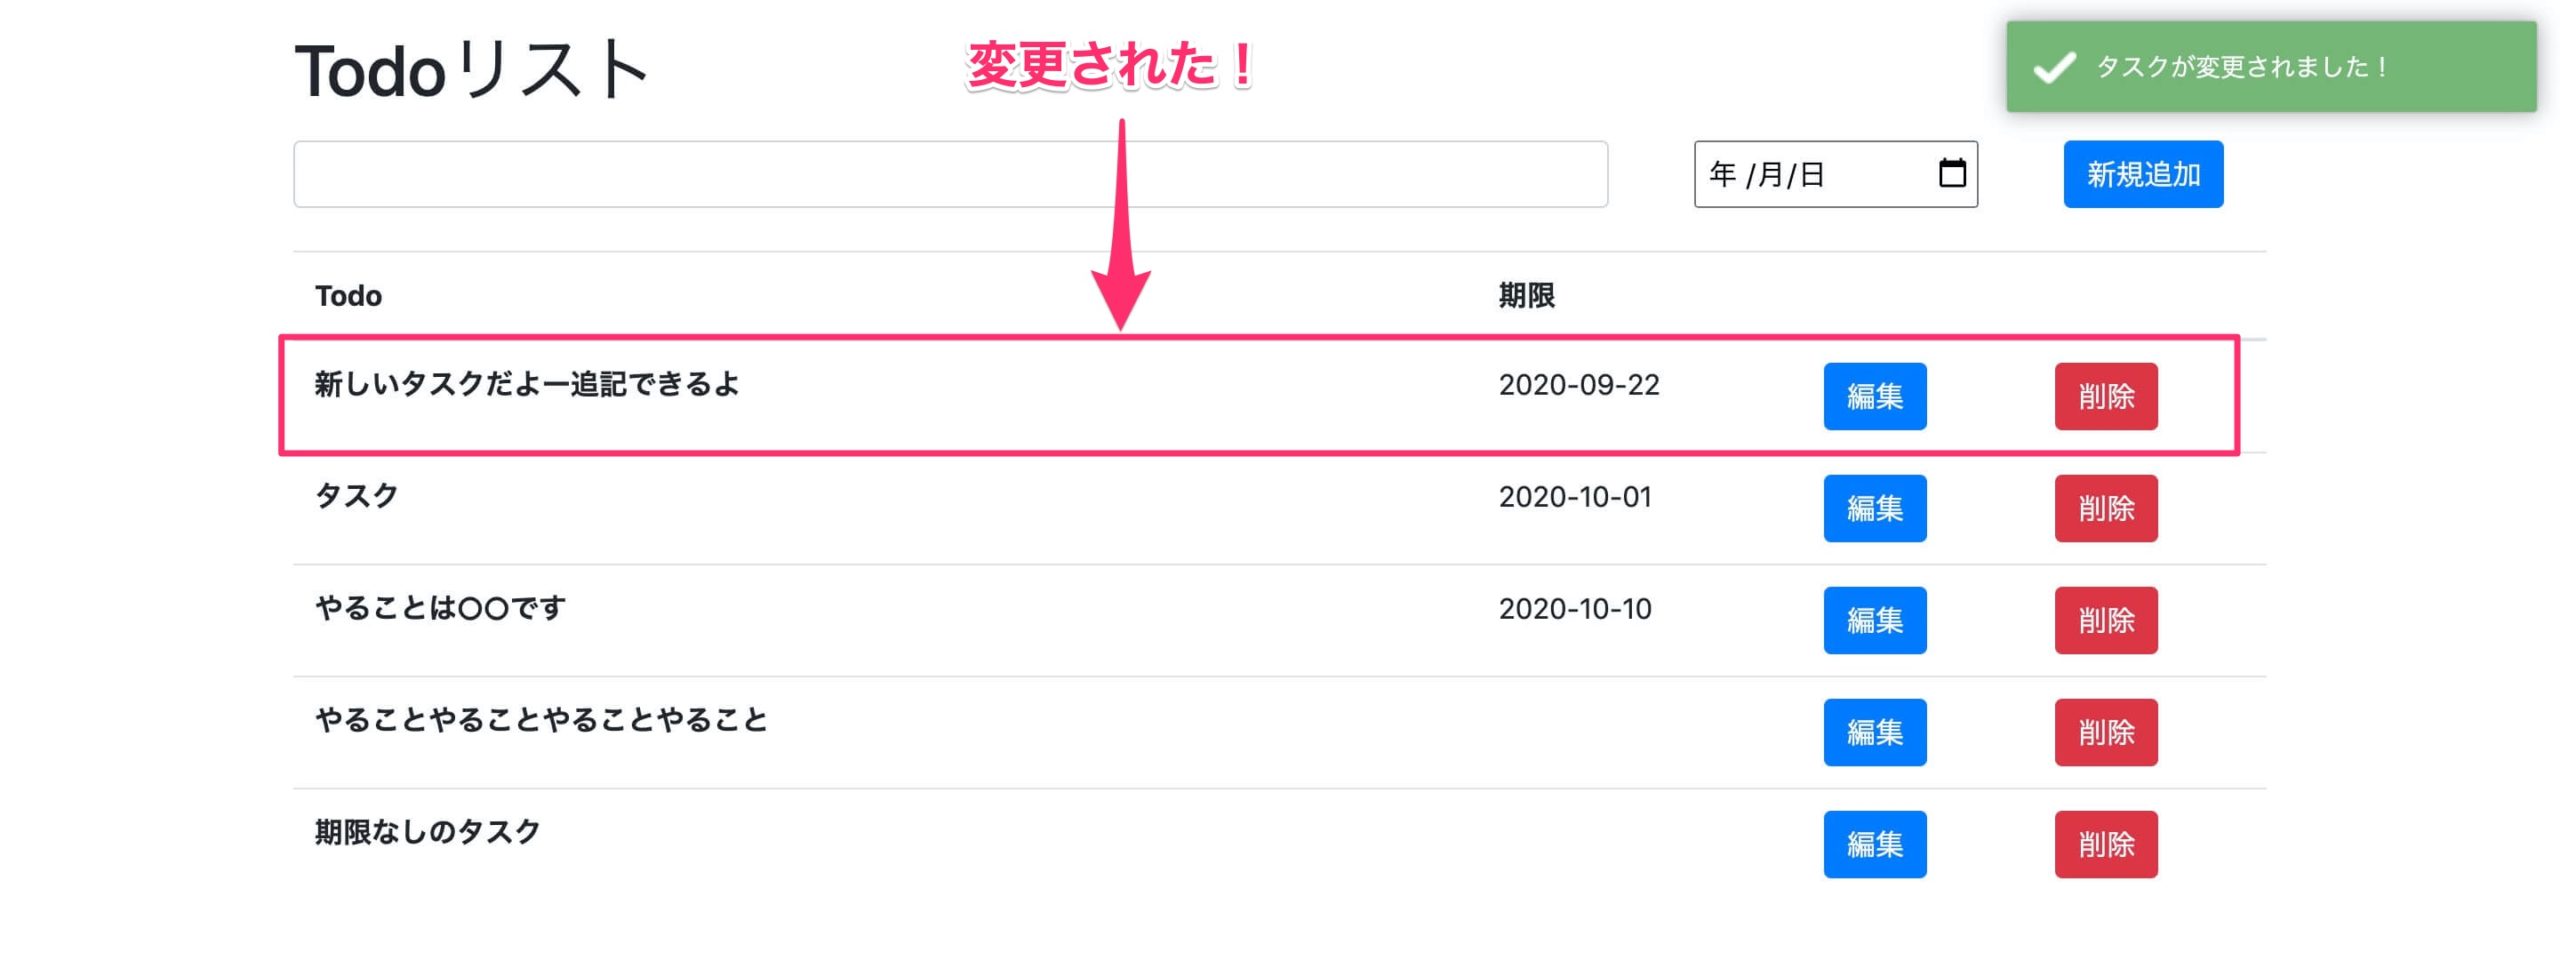
Todoリストの編集を実装する
「編集」ボタンを押すと編集ページに行き、編集後にまたTodoの一覧に戻ってくるという感じです。
まず、index.blade.phpの編集ボタンのリンク先を編集します。
<td><a href="{{ route('todos.edit', $todo->id) }}" class="btn btn-primary">編集</a></td>
resources/views/todos/edit.blade.phpを作成し、index.blade.phpからコピペして編集します。
<!DOCTYPE html>
<html lang="ja">
<head>
    <meta charset="UTF-8">
    <meta name="viewport" content="width=device-width, initial-scale=1.0">
    <meta http-equiv="X-UA-Compatible" content="ie=edge">
    <title>Todoリスト - 編集</title>
    <link rel="stylesheet" href="https://stackpath.bootstrapcdn.com/bootstrap/4.5.2/css/bootstrap.min.css" integrity="sha384-JcKb8q3iqJ61gNV9KGb8thSsNjpSL0n8PARn9HuZOnIxN0hoP+VmmDGMN5t9UJ0Z" crossorigin="anonymous">
</head>
<body>
    <div class="container mt-3">
        <h1>Todoリスト - 編集</h1>
    </div>
    <div class="container mt-3">
        <div class="container mb-4">
            {!! Form::open(['route' => ['todos.update', $todo->id], 'method' => 'POST']) !!}
            {{ csrf_field() }}
            {{ method_field('PUT') }}
                <div class="row">
                    {{ Form::text('updateTodo', $todo->todo, ['class' => 'form-control col-7 mr-4']) }}
                    {{ Form::date('updateDeadline', $todo->deadline, ['class' => 'mr-4']) }}
                    {{ Form::submit('Todoリストを更新', ['class' => 'btn btn-primary mr-3']) }}
                    <a href="{{ route('todos.index') }}" class="btn btn-danger">戻る</a>
                </div>
            {!! Form::close() !!}
        </div>
        @if ($errors->has('updateTodo'))
            <p class="alert alert-danger">{{ $errors->first('updateTodo') }}</p>
        @endif
        @if ($errors->has('updateDeadline'))
            <p class="alert alert-danger">{{ $errors->first('updateDeadline') }}</p>
        @endif
    </div>
</body>
</html>
そしてapp/Http/Controllers/TodoController.phpのeditとupdateも編集します。
public function edit($id)
    {
        $todo = Todo::find($id);

        return view('todos.edit', [
            'todo' => $todo,
        ]);
    }
public function update(Request $request, $id)
    {
        $request->validate([
            'updateTodo'     => 'required|max:100',
            'updateDeadline' => 'nullable|after:"now"',
        ]);

        $todo = Todo::find($id);

        $todo->todo     = $request->updateTodo;
        $todo->deadline = $request->updateDeadline;

        $todo->save();

        return redirect()->route('todos.index');
    }
resources/lang/ja/validation.phpの最後にもちょっと追加。
'attributes' => [
        'newTodo'     => 'Todo',
        'newDeadline' => '期限',
        'updateTodo'     => 'Todo',
        'updateDeadline' => '期限',
    ],
削除ボタンを実装する
resources/views/todos/index.blade.phpの削除ボタンを修正。
@foreach ($todos as $todo)
    <tr>
        <th scope="row" class="todo">{{ $todo->todo }}</th>
        <td>{{ $todo->deadline }}</td>
        <td><a href="{{ route('todos.edit', $todo->id) }}" class="btn btn-primary">編集</a></td>
        {!! Form::open(['route' => ['todos.destroy', $todo->id], 'method' => 'POST']) !!}
        {{ csrf_field() }}
        {{ method_field('DELETE') }}
            <td>{{ Form::submit('削除', ['class' => 'btn btn-danger']) }}</td>
        {!! Form::close() !!}
    </tr>
@endforeach
app/Http/Controllers/TodoController.phpのdestroyを編集。
public function destroy($id)
    {
        $todo = Todo::find($id);

        $todo->delete();

        return redirect()->route('todos.index');
    }
これで削除ボタンが実装できました。
今回、createとshowのメソッドは不要なので、削除しておきました。
フラッシュメッセージを表示する
最後に登録や更新・削除した時に、いい感じにふわっと出るフラッシュメッセージの実装をしてみます。
ふわっと表示させるために、jQueryのライブラリ「Toastr」を使います。
そして、「Laravel 7.x Toastr Notifications Example Tutorial」の記事の通りにやっていきました。
composer require brian2694/laravel-toastr
上記コマンドをうった後に、app/Http/Controllers/TodoController.phpを編集します。
<?php

namespace App\Http\Controllers;

use Illuminate\Http\Request;
use App\Todo;
use Brian2694\Toastr\Facades\Toastr;

class TodoController extends Controller
{
    /**
     * Display a listing of the resource.
     *
     * @return \Illuminate\Http\Response
     */
    public function index()
    {
        // 期限が近いものから順に表示する、期限がないものは最後に持っていく
        $todos = Todo::orderByRaw('`deadline` IS NULL ASC')->orderBy('deadline')->get();

        return view('todos.index', [
            'todos' => $todos,
        ]);
    }

    /**
     * Store a newly created resource in storage.
     *
     * @param  \Illuminate\Http\Request  $request
     * @return \Illuminate\Http\Response
     */
    public function store(Request $request)
    {
        $request->validate([
            'newTodo'     => 'required|max:100',
            'newDeadline' => 'nullable|after:"now"',
        ]);

        // DBに保存
        Todo::create([
            'todo'     => $request->newTodo,
            'deadline' => $request->newDeadline,
        ]);

        // フラッシュメッセージ
        Toastr::success('新しいタスクが追加されました!');

        return redirect()->route('todos.index');
    }

    /**
     * Show the form for editing the specified resource.
     *
     * @param  int  $id
     * @return \Illuminate\Http\Response
     */
    public function edit($id)
    {
        $todo = Todo::find($id);

        return view('todos.edit', [
            'todo' => $todo,
        ]);
    }

    /**
     * Update the specified resource in storage.
     *
     * @param  \Illuminate\Http\Request  $request
     * @param  int  $id
     * @return \Illuminate\Http\Response
     */
    public function update(Request $request, $id)
    {
        $request->validate([
            'updateTodo'     => 'required|max:100',
            'updateDeadline' => 'nullable|after:"now"',
        ]);

        $todo = Todo::find($id);

        $todo->todo     = $request->updateTodo;
        $todo->deadline = $request->updateDeadline;

        $todo->save();

        // フラッシュメッセージ
        Toastr::success('タスクが変更されました!');

        return redirect()->route('todos.index');
    }

    /**
     * Remove the specified resource from storage.
     *
     * @param  int  $id
     * @return \Illuminate\Http\Response
     */
    public function destroy($id)
    {
        $todo = Todo::find($id);

        $todo->delete();

        // フラッシュメッセージ
        Toastr::success('タスクが削除されました!');

        return redirect()->route('todos.index');
    }
}
ビュー側で表示させます。
先ほどの記事の通りにCSSとJSを読み込んで、以下を書くだけ。
{!! Toastr::message() !!}
これで簡単に、いい感じのフラッシュメッセージができました。
右上にふわっと出てきます。
【まとめ】Todoリストアプリの作成手順
今回はCRUD機能があるTodoリストアプリを作成しました。
単純なようで意外に難しく、良い勉強になりました。
引き続きLaravelでアプリを作成して、アウトプットしていこうと思います。
コード全体を見たい!という方は、こちら(GitHub)からどうぞ。
以上です。最後まで見てくださり、ありがとうございました。
» Laravelで作成したアプリやアウトプットの一覧はこちら
最後に宣伝
ココナラで、コーディングの相談を受け付けています。
- CSSが上手く作れない
- JavaScriptが思ったように動かない
- ブログのデザインを修正したい
- 勉強中でわからないところがあるから教えてほしい
このようなお悩みを解決していますので、「こんなの解決できる?」ということがあったら、ぜひ質問だけでも以下のリンクよりどうぞ。


コメント